
Screen
-
class
Screen
Class Screen represents a pysical monitor mainly for the capturing process (grabbing a rectangle of pixels from a screenshot).
For Multi Monitor Environments it contains features to map to the relevant monitor.
Since class Screen extends class Region, all methods of class Region are available with a Screen object.
Note
Be Aware that using the whole screen for find operations has an impact on performance. So if possible restrict a find operation to a smaller region object (e.g. reg.find()) to speed up processing.
Screen: Setting, Getting Attributes and Information
-
class
Screen -
Screen([id])¶ Create a new Screen object
Parameters: id – an integer number indicating which monitor in a multi-monitor environment. Returns: a new screen object. It creates a new screen object, that represents the default/primary monitor (whose id is 0), if id is omitted. Numbers 1 and higher represent additional monitors that are available at the time, the script is running (read for details).
Using numbers, that do not represent an existing monitor, will stop the script with an error. So you may either use getNumberScreens() or exception handling, to avoid this.
-
Note
If you want to access the default/primary monitor ( Screen(0) ) without creating a new screen object, use the constant reference SCREEN, that is initiated when your script starts: SCREEN=Screen(0).
getNumberScreens()¶Get the number of screens in a multi-monitor environment at the time the script is running
getBounds()¶Get the dimensions of monitor represented by the screen object.
Returns: a rectangle object The width and height of the rectangle denote the dimensions of the monitor represented by the screen object. These attributes are obtained from the operating system. They can not be modified using Sikuli script.
showMonitors()¶Prints information about the current monitor setup - example:
*** monitor configuration [ 2 Screen(s)] ***
*** Primary is Screen 0
Screen 0: R[0,0 1920x1200]@S(0)
Screen 1: R[1920,0 1920x1080]@S(1)
*** end monitor configuration ***
Screen as (Default) Region
All region methods have to be used as someRegion.find(PS), where someRegion is a Region object
(or a Screen or a Match object). If written as find(PS) it acts on the default
screen being the implicit region in this case (mapped to the constant reference
SCREEN). In Multi Monitor Environments this is the primary monitor (use the
constant reference SCREEN, to access it all the time), that normally is Screen(0),
but might be another Screen() object depending on your platform and settings.
Using the whole screen for find operations slows down processing speed, because of time consuming
searches on the whole screen. So to speed up processing, saying someRegion.find(PS) will restrict the search
to the specified rectangle. Another possibility is to say setROI() to restrict the
search for all following find operations to a smaller region than the whole screen.
This will speed up processing, if the region is significantly smaller than the whole
screen.
Capturing - taking screenshots - create images
Capturing is the feature, to grab a rectangle of pixels from a screenshot and save it to a file for later use. Each time, a capturing is done, a new screenshot is taken (Screen.capture()).
There is an interactive variant Screen.selectRegion(), that just returns the position and dimension of
the rectangle selected by the user interactively.
Note
… on IDE: Both features are available in the IDE via buttons in the toolbar.
The Capture button interactively selects the rectangle on the screen,
whose pixel content is saved to the current script’s bundlepath and
then inserted (as thumbnail or the generated filename) at the current edit position in the script.
Note
… on image naming in the IDE If nothing else is mentioned, the image name is built as a time-stamp with the ending .png. In the IDE you can either change the name later via the Preview feature or define it before capturing:
someName =
leaving the cursor on the same line after the =. Using the capturebutton now, will end up in an image named someImage.png. This can be used, to implement some naming convention for the captured images.
In the settings of the IDE there is an option, that allows to get a prompt for the imagename (interactive naming).
-
class
Screen -
capture([region | rectangle | text])¶ -
capture(x, y, w, h) Parameters: - region – an existing region object.
- rectangle – an existing rectangle object (e.g., as a return value of another appropriate region method).
- text – text to display in the middle of the screen in the interactive mode.
- x – x position of the rectangle to capture
- y – y position of the rectangle to capture
- w – width of the rectangle to capture
- h – height of the rectangle to capture
Returns: the path to the file (always a file in temp storage), where the captured image was saved. In interactive mode, the user may cancel the capturing, in which case None is returned.
Interactive Mode: The script enters the screen-capture mode like when clicking the button in the IDE, enabling the user to capture a rectangle on the screen. If no text is given, the default “Select a region on the screen” is displayed.
If any valid arguments other than text are specified, capture() automatically captures the given rectangle of the screen. If valid, a new screenshot is taken and the content of the selected rectangle is saved in a temporary file. The file name is returned and can be used later in the script as a reference to this image. It can be used directly in cases, where a parameter PS is allowed (e.g.
Region.find(),Region.click(), …).
-
selectRegion([text])¶ Select a region on the screen interactively
Parameters: text – Text to display in the middle of the screen. Returns: a new Regionobject orNone, if the user cancels the capturing process.text is displayed for about 2 seconds in the middle of the screen. If text is omitted, the default “Select a region on the screen” is displayed.
The interactive capture mode is entered and allows the user to select a region the same way as using the selection tool in the IDE.
Note: You should check the result, since the user may cancel the capturing.
-
Save the captured image elsewhere (not temporary)
New in version 1.1.2.
-
class
Screen -
capture(region | text, [path, ]name) only available in Python scripting (MUST be used as such undotted)
Works principally the same as the normal capture, but directly stores the resulting image to the specified location. The
namespec need not have the.pngending.If the path specification is omitted, the imagefile is stored in the current bundlepath. In this case the imagename will finally be
bundlepath/_name.png, where the leading underscore is an IDE convention to block the automatic deletion of images, that are not namely referenced somewhere in the script, at the time the script is saved in the IDE.Parameters: - region – an existing region object
- text – text to display in the interactive mode.
- path – a path to a folder where the image is stored (bundlepath if omitted)
- name – name of the image file (.png can be omitted)
Returns: the absolute path of the stored image as
path/name.pngor None if no success
-
Note
…on Java usage or in non-Python
String filename = screen.saveCapture(Object... args)
String filename = region.saveCapture(Object... args)
… where screen/region are some existing Screen/Region objects.
The args are according to the above parameter specifications of the two Screen.capture() variants.
screen.saveCapture() is a shortcut for String filename = screen.cmdCapture(Object... args).getStoredAt()
The intermediate result of cmdCapture is a ScreenImage object, that holds the image internally as BufferedImage (accessible using ScreenImage.get()).
Multi-Monitor Environments
If more than one monitor is available, Sikuli is able to manage regions and click points on these monitors.
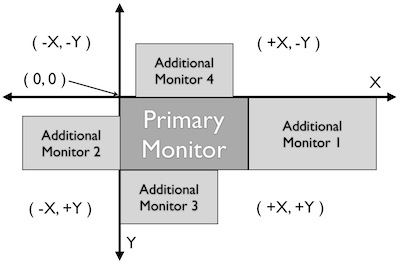
The base is the coordinate system (picture above), that positions the primary monitor with its upper left corner at (0,0) extending the x-direction to the right and the y-direction towards the lower boundary of the screen. The position of additional monitors can be configured in the operating system to be on either side of the primary monitor, with different positions and sizes. So monitors left of the primary will have pixels with negative x-values and monitors above will have negative y-values (left and above both x and y are negative).
At script start, Sikuli gets the relevant information from the operating system and creates respective screen objects, that have an ID (0 for the first or primary monitor, 1 and higher for additional monitors with a maximum of one less than the number of screens) and know the rectangle, they cover in the coordinate system. These informations are readonly for a script.
These predefined screen objects can be accessed with Screen(0), Screen(1), … and are normally used to create your own screen objects. The possibility to use the region methods on a default region mapped to the primary monitor is implemented with the constant reference SCREEN. This concept is only available for the primary monitor.
How to get the relevant information:
getNumberScreens()returns the number of available screens.getBounds()returns the rectangle covered by the default/primary monitor.Screen.getBounds()returns the rectangle covered by a screen object created usingScreen(id).
Be aware: Changes in your system settings are only recognized by the IDE, when it is started.
Windows: The monitor, that is the first one based on hardware mapping (e.g. the laptop monitor), will always be Screen(0). In the Windows settings it is possible to place the taskbar on one of the secondary monitors, which makes it the primary monitor getting the base coordinates (0,0). The other available monitors are mapped around based on your settings. But the Sikuli internal mapping is not changed, so the primary monitor might be any of your Screen() objects. Sikuli takes care for that and maps SCREEN always to the primary monitor (the one with the (0,0) coordinates). So for example you have a laptop with an external monitor, that shows the taskbar (is primary monitor):
- SCREEN maps to Screen(1)
- Screen(0) is your laptop monitor
Mac: The monitor, that has the System Menu Bar, is always Screen(0) and mapped to the default SCREEN.
Linux (Under construction)
With its rectangle, a screen object is always identical with the monitor
it was created using Screen(id). Using Region.setROI() to restrict
the region of interest for find operations has no effect on the base rectangle of
the screen object.
On the other hand region objects and location objects can be positioned anywhere in the coordinate system. Only when a find operation or a click action has to be performed, the objects rectangle or point has to be inside the rectangle of an existing monitor (basically repersented by Screen(0), Screen(1), …). When this condition is met, everything works as expected and known from a single monitor system.
With finding and acting there are the following exceptions:
- Point Outside: a click point is outside any monitor rectangle. The
clickpoint will be mapped to the edges or corners of the primary monitor
according to the relative position:
- to the edges if its x or y value is in the range of the respective edge (right, left, above, below)i
- to the corners, if x and y are outside any range of any edge (left/above -> upper left corner, …)
- Region Outside: a region is completely outside any monitor
- a click action is handled in thesame way as Point Outside
- a find operation will always fail
- Region Partially Outside: a region is partially outside a monitor but
not overlapping another monitor
- a click action is handled in the same way as Point Outside
- a find operation will be carried out only in the part of region within the bounds of the monitor, excluding the area outside the monitor.
- Region Across Monitors: a region lies across multiple monitors:
- a click action is handled in the same way as Point Outside
- a find operation will be restricted to the region within the bounds of the monitor that has a smaller id.
An interactive capture (the user is asked to select an image or a rectangle via
Screen.capture() or Screen.selectRegion()) will automatically be
restricted to the monitor, where it was started.
A scripted capture using a rectangle or a region
(i.e. Screen.capture( region | rectangle )),
will be handled accordingly:
- Region Outside: no image is captured, None is returned
- Region Partially Outside: the returned image will only cover the part inside the monitor
- Region Across Monitors: the returned image will only cover the part inside the monitor with the smallest id.
Based on the knowledge of your monitor configuration, you can now start some further
evaluations using e.g. Region.hover() together with
setShowActions(True) and highlighting using Region.highlight().
Connecting to a VNC Server (VNCScreen)
New in version 1.1.1.
The implementation is based on the TigerVNC Viewer package and was initially contributed by Pepijn Van Eeckhoudt https://github.com/pepijnve.
The intention of the following information is to only describe what is officially supported by a VNCScreen object aquired using vncStart(). For usage of the classes in the package itself you have to read the javadocs or look into the sources.
To make the package more useable there are now highlevel wrappers, that hide the logic to create, start and stop the socket based connection. More than one connection can be used at one time, each represented by a different VNCScreen object.
-
vncStart([ip="127.0.0.1",] [port=5900,] [password=None,][connectionTimeout=10,] [timeout=1000])¶ Start a VNC session to the given (usually remote) running VNC server and on success get a VNCScreen object, that can be used like a Screen object. About the restrictions and special features see the comments below.
Parameters: - ip – the server IP (default: 127.0.0.1 loopback/localhost)
- port – the port number (default 5900)
- password – for password protected connections as plain text
- connectionTimeout – seconds to wait for a valid connection (default 10)
- timeout – the timout value in milli-seconds during normal operation (default 1000)
Returns: a new VNCScreen object useable like a Screen object
-
stop()¶ Stop the referenced VNC session, which closes the underlying socket connection and makes the VNCScreen object unuseable.
mandatory usage
someVNCScreen.stop(), wheresomeVNCScreenis a VNCScreen object aquired before usingsomeVNCScreen = vncStart(...).In basic operation environments there is no need to issue the
vnc.stop()explicitely, because all active VNC connections are auto-stopped at the end of a script run or at termination of a Java run.
USAGE IN JAVA as being a static method in class VNCScreen, vncStart() has to be used as:
VNCScreen vnc = VNCScreen.start(ip, port, connectionTimeout, timeout)
// or   VNCScreen vnc = VNCScreen.start(ip, port, password, connectionTimeout, timeout)
// the parameters are mandatory with values as mentioned above
// password can be null for unprotected connections
// do something with the vnc object
vnc.stop() // optional - see above
Some general information and comments
Due to the current implementation concept of VNCScreen, Region or Location objects intended to be on a remote screen have to know this fact. Otherwise they are simply Regions and Locations on a local screen with fitting coordinates. This knowledge of being on a remote screen is internally propagated from one object to a new object created by a feature of the existing object. Hence in the beginning only the created VNCScreen object knows about being on a remote screen. So to create Regions and Locations on the remote screen from scratch, you have to use features of VNCScreen.
- These are the rules:
- the VNCScreen object itself is a remote Region in this sense
- each
Match/Region/Locationcreated using aVNCScreenobject knows about being remote - each
Region/Locationobject created using a feature of aremote Region/Locationis also remote (see comment) - to create a
new Region/Locationfrom scratch use thenewRegion()/newLocation()methods of VNCScreen - all mouse and keyboard actions using remote Regions/Locations are going to the remote screen
Comment If you encounter problems with a remote Region/Location you think should be remote, but is not (e.g. clicking locally), then this is a bug, that can be worked around using:
# vnc is a VNCScreen object
# reg/loc are faulty Region/Location
reg = vnc.set(reg)
loc = vnc.set(loc)
# now both are set to being remote
Methods to create new remote Regions and Locations:
# someRegion/someLocation may be normal Region/Location objects
# remoteRegion/remoteLocation/remoteMatch know about being remote

vnc = vncStart("192.168.2.25") # some VNC Server in the local net

# create from scratch
remoteRegion = vnc.newRegion(x, y, w, h)
remoteRegion = vnc.newRegion(someRegion)
remoteLocation = vnc.newLocation(x, y)
remoteLocation = vnc.newLocation(someLocation)

# remote aspect will automatically be propagated (in most cases :-(
remoteRegion = remoteRegion.right(200)
remoteMatch = vnc.find("someImage.png")
remoteLocation = remoteMatch.getCenter()

# inject the remote aspect if needed
vnc.getRow(3, 4).getCol(1, 3).click() # will not be on VNC screen
# so write as:
vnc.set(vnc.getRow(3, 4).getCol(1, 3)).click() # now on VNC Screen
BE AWARE
- Due to the correct RFB protocol implementaion in TigerVNC Viewer, it may take some time (up to few seconds depending on line speed and remote screen size) to initialize the frame buffer content after connection start. So if you get problems with the first access to the remote screen content (capture, userCapture, find operations explicit or implicit), you should simply add an appropriate wait() after the vncStart(). Experiences in local environment with large screens: 2 - 3 seconds are sufficient.
- Not all documented Screen/Region/Location methods might work as expected due to implementation quirks. In case, feel free to report a bug (see comment above).
- The current implementation only supports a limited set of RemoteFrameBuffer protocols. The above described level of usage is successfully tested from a Mac OSX 10.10+ against a TightVNC server running on a Windows 10 64-Bit in the local network or both client and server on the mentioned Windows machine using the loopback IP (127.0.0.1).
Connecting to an Android device or emulator (ADBScreen)
New in version 2.0.0.
Planned to be revised in SikuliX 2.1.0 — until then no support — no bugs accepted — use as is
Based on the ideas and first implementation of Gergő Törcsvári https://github.com/tg44 it is now possible to capture images from an Android device in the IDE and run scripts the same way as with a local screen. You can wait for images to appear on the Android screen and act with taps, swipes and text input. Since the avarage latency for a search operation is about 1 second (varies with screen resolution, region size and device processor speed), this solution only makes sense for basic automation and testing, where speed does not matter.
- The implementation uses the
Android Debugging Bridge tool adband theJava wrapper jadb: jadb: the sources (1.1.0-SNAPSHOT per September 2018) are bundled in SikuliX (https://github.com/vidstige/jadb)adb: the tool must be present on your system (see: https://developer.android.com/studio/releases/platform-tools)
It can be used with devices and emulators with minimum Android version 4 and does not need rooting. A device has to be attached via USB (first tests using a WiFi connection where discouraging). Currently only one connection is supported. If more than one device is available, then the one is connected, that shows up in first place on the device list.
The SikuliX IDE has a menu entry in the Tools menu, that lets you make some basic tests, to assure, that your
setup will work.
If you want to use this feature, you should be familiar at least with the basics of adb.
The usage is similar to VNCScreen: you work with an ADBScreen object, that represents the device’s screen and in SikuliX terms is a Region that provides all search and action features.
As far as possible the actions are transformed to Android actions:
a click gets a tap and type/paste result in an input text
Most mouse and keyboard actions will do nothing but produce an error log.
Furthermore Android typical actions are available with class Region: tap, swipe, input,
… and it is possible to issue device commands via exec.
If used with a local screen, these features silently do nothing.
How to tell SikuliX, where you have adb on your system
With a standard setup, there is somewhere a folder containing a folder plattform-tools, that in turn contains the
executable adb (Windows: adb.exe). In this case, specifying the absolute path to the folder containing
the platform-tools is sufficient.
In all other cases you must specify the complete absolute path to the executable adb.
In the following adb-path is one of the above alternatives.
Option 1: have a system environment variable with the key sikulixadb and the value adb-path
Option 2: have a Java property (-D…) with the key sikulixadb and the value adb-path
Option 3: specify adb-path as parameter when starting the adb service in your script/program (see below).
Be aware: This option 3 will not help, if you want to use the menu entry in the IDE’s Tools menu
How to start and use the adb service
Take care, that your Android device is attached via USB to your system and is setup as accessible (see Android docs).
Now you might use the IDE’s Tool menu entry, to check, whether the device is found and accessible. Of course you might use your own script/program/solution to do that.
AS already mentioned: The Java class ADBScreen is the implementation, that represents the Android device in SikuliX
and has the features of a normal Screen object and bound Regions implemented to work towards the device.
To get an object representing the device you either use
adbscr = ADBScreen.start() with above options 1 or 2
or
adbscr = ADBScreen.start("adb-path") hence using option 3
For Jython scripting there is a shortcut: adbscr = adbStart() or adbscr = adbStart("adb-path").
Now for the rest of your script/program the variable adbscr represents the attached device and allows
to use the implemented features in the normal way as adbscr.someImplementedFeature(...).
To close a connection to a device use adbscr.stop(). This is done automatically when a script/program ends.